SpringBoot自动装配和Starter原理
# 背景
使用过 Spring 的小伙伴,一定有被 XML 配置统治的恐惧。即使 Spring 后面引入了基于注解的配置,我们在开启某些 Spring 特性或者引入第三方依赖的时候,还是需要用 XML 或 Java 进行显式配置。
但是,SpringBoot 项目,我们只需要添加相关依赖,无需配置,通过启动的 main 方法即可。并且,我们通过 SpringBoot 的全局配置文件 application.properties或application.yml即可对项目进行设置比如更换端口号,配置 JPA 属性等等。
为什么 SpringBoot 使用起来这么酸爽呢? 这得益于其自动装配。自动装配可以说是 SpringBoot 的核心,那究竟什么是自动装配呢?
真实面试体验:
在 Java后端 的面试时,SpringBoot也是会经常性被问到的,最常见的两个问题:
- SpringBoot对比传统的SpringMVC的开发,有什么不同? ——①简化配置,开箱即用 ②约定大于配置
- SpringBoot是如何实现简化配置、自动加载配置的?SpringBoot的Starter是如何实现的?
其实第二个问题,都可以回归到本文的主题 “SpringBoot 自动装配原理” 。
# 一、SpringBoot介绍
SpringBoot主要用来简化使用Spring的难度和繁重的XML配置,它是Spring组件的一站式解决方案,采取了约定优于配置的方法。
SpringBoot的特征:
- 可以创建独立的 Spring 应用程序,并且基于其Maven或Gradle插件,可以创建可执行的JARs和WARs;
- 简化配置,开箱即用,尽可能自动配置Spring和第三方依赖库
- 直接嵌入Tmocat、Jetty等Servlet服务器
- 创建独立的Spring程序
- 提供一系列监控功能,例如指标、运行状况等的监控
- 完全不需要代码生成和XML配置
自己的理解:
- 在过去,我们要让一个Spring项目启动,往往需要配置很多的xml配置文件,但是在使用SpringBoot之后,我们甚至无需写一行xml,就可以直接将整个项目启动,这种“零配置”的做法减轻了开发人员很多的工作量,可以让开发人员专注于业务开发。
- 采用了JavaConfig的配置风格,导入组件的方式也由原来的直接配置改为@EnableXXXX,这种纯Java代码的配置和导入组件的方式,使代码看上去更加的优雅。
SpringBoot之所以可以做到简化配置文件直接启动,无外乎是其内部的两种设计策略:开箱即用和约定大于配置。
开箱即用:在开发过程中,通过maven项目的pom文件中添加相关依赖包,然后通过相应的注解来代替繁琐的XML配置以管理对象的生命周期。
约定大于配置:由SpringBoot本身来配置目标结构,由开发者在结构中添加信息的软件设计范式。这一特点虽降低了部分灵活性,增加了BUG定位的复杂性,但减少了开发人员需要做出决定的数量,同时减少了大量的XML配置,并且可以将代码编译、测试和打包等工作自动化。
# 二、什么是 SpringBoot 的自动装配?
我们现在提到自动装配的时候,一般会和 Spring Boot 联系在一起。但是,实际上 Spring Framework 早就实现了这个功能。Spring Boot 只是在其基础上,通过 SPI 的方式,做了进一步优化。
SPI ,全称为 Service Provider Interface(服务提供者接口),是一种服务发现机制。它通过在classpath路径下的
META-INF/services文件夹查找文件,自动加载文件中所定义的类。
SpringBoot 定义了一套接口规范,这套规范规定:SpringBoot 在启动时会扫描外部引用 jar 包中的
META-INF/spring.factories文件,将文件中配置的类型信息加载到 Spring 容器(此处涉及到 JVM 类 加载机制与 Spring 的容器知识),并执行类中定义的各种操作。对于外部 jar 来说,只需要按照 SpringBoot 定义的标准,就能将自己的功能装置进 SpringBoot。
没有 Spring Boot 的情况下,如果我们需要引入第三方依赖,需要手动配置,非常麻烦。但是,Spring Boot 中,我们直接引入一个 starter 即可。引入 starter 之后,我们通过少量注解和一些简单的配置就能使用第三方组件提供的功能了。
在我看来,自动装配可以简单理解为:通过注解或者一些简单的配置就能在 Spring Boot 的帮助下实现某块功能。
# 三、开箱即用体验
# SpringBoot方式
SpringBoot提供了我们快速创建SpringBoot项目的地方:https://start.spring.io/ (opens new window)
我们只需要在这个网页中把整个项目起好名字,然后选好我们需要的组件,就可以直接获得一个可以跑起来的SpringBoot项目。
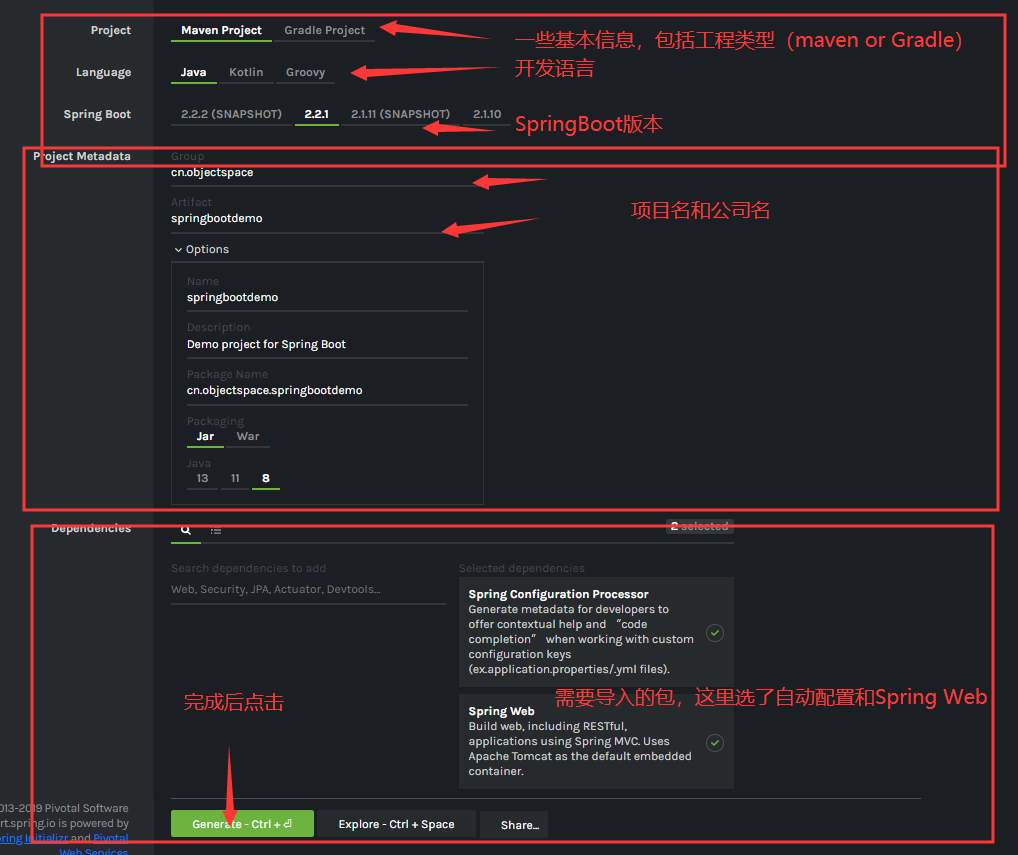
我们只需要填完上述信息,点击Generate,就可以直接将一个SpringBoot项目下载下来,然后导入我们的IDE,Eclipse或者IDEA都可,之后就可以直接将它运行起来。
# SSM方式(用来对比)
反观过去SSM框架的SpringMVC配置,我这里有一份留存的大家可以对比一下。
spring-web.xml:
<?xml version="1.0" encoding="UTF-8"?>
<beans xmlns="http://www.springframework.org/schema/beans"
    xmlns:xsi="http://www.w3.org/2001/XMLSchema-instance" xmlns:context="http://www.springframework.org/schema/context"
    xmlns:mvc="http://www.springframework.org/schema/mvc"
    xsi:schemaLocation="http://www.springframework.org/schema/beans
    http://www.springframework.org/schema/beans/spring-beans.xsd
    http://www.springframework.org/schema/context
    http://www.springframework.org/schema/context/spring-context.xsd
    http://www.springframework.org/schema/mvc
    http://www.springframework.org/schema/mvc/spring-mvc-3.2.xsd">
    <!-- 配置SpringMVC -->
    <!-- 1.开启SpringMVC注解模式 -->
    <!-- 简化配置: (1)自动注册DefaultAnootationHandlerMapping,AnotationMethodHandlerAdapter
        (2)提供一些列:数据绑定,数字和日期的format @NumberFormat, @DateTimeFormat, xml,json默认读写支持 -->
    <mvc:annotation-driven />

    <!-- 2.静态资源默认servlet配置 (1)加入对静态资源的处理:js,gif,png (2)允许使用"/"做整体映射 -->
    <mvc:resources mapping="/resources/**" location="/resources/" />
    <mvc:default-servlet-handler />

    <!-- 3.定义视图解析器 -->
    <bean id="viewResolver"
        class="org.springframework.web.servlet.view.InternalResourceViewResolver">
        <property name="prefix" value="/WEB-INF/html/"></property>
        <property name="suffix" value=".html"></property>
    </bean>
    <!-- 文件上传解析器 -->
    <bean id="multipartResolver"
        class="org.springframework.web.multipart.commons.CommonsMultipartResolver">
        <property name="defaultEncoding" value="utf-8"></property>
        <property name="maxUploadSize" value="10485760000"></property><!-- 最大上传文件大小 -->
        <property name="maxInMemorySize" value="20971520"></property>
    </bean>
    <!-- 在spring-mvc.xml文件中加入这段配置后,spring返回给页面的都是utf-8编码了 -->
    <bean
        class="org.springframework.web.servlet.mvc.annotation.AnnotationMethodHandlerAdapter">
        <property name="messageConverters">
            <list>
                <bean
                    class="org.springframework.http.converter.StringHttpMessageConverter">
                    <property name="supportedMediaTypes">
                        <list>
                            <value>text/html;charset=UTF-8</value>
                        </list>
                    </property>
                </bean>
            </list>
        </property>
    </bean>
    <!-- 4.扫描web相关的bean -->
    <context:component-scan base-package="com.SchoolShop.o2o.web" />
    <!-- 5.权限拦截器 -->
</beans>COPY
2
3
4
5
6
7
8
9
10
11
12
13
14
15
16
17
18
19
20
21
22
23
24
25
26
27
28
29
30
31
32
33
34
35
36
37
38
39
40
41
42
43
44
45
46
47
48
49
50
51
52
53
web.xml:
<servlet>
    <servlet-name>spring-dispatcher</servlet-name>
    <servlet-class>org.springframework.web.servlet.DispatcherServlet</servlet-class>
    <init-param>
        <param-name>contextConfigLocation</param-name>
        <param-value>classpath:spring/spring-*.xml</param-value>
    </init-param>
  </servlet>
  <servlet-mapping>
    <servlet-name>spring-dispatcher</servlet-name>
    <!-- 默认匹配所有请求 -->
    <url-pattern>/</url-pattern>
  </servlet-mapping>COPY
2
3
4
5
6
7
8
9
10
11
12
13
可以看到,这里需要配置两个文件,web.xml和spring-web.xml,配置可以说是相当繁重。
那么相对于这个,SpringBoot的开箱即用就显得特别方便。
# 四、(重点)SpringBoot 是如何实现自动装配的?
我们从 pom.xml 开始进行分析
# spring-boot-dependencies:作为父工程,维护一套版本和资源库
spring-boot-starter-parent依赖继承自spring-boot-dependencies。无论是 继承spring-boot-starter-parent ,还是导入spring-boot-dependencies项目依赖,都可以开启SpringBoot项目。
spring-boot-starter-parent
<parent>
    <groupId>org.springframework.boot</groupId>
    <artifactId>spring-boot-starter-parent</artifactId>
    <version>2.2.1.RELEASE</version>
    <relativePath/>
</parent>
2
3
4
5
6
按住Ctrl+鼠标左键,可以点进去,发现里面除了一些插件和配置文件的格式之外,还存在一个依赖。
<parent>
    <groupId>org.springframework.boot</groupId>
    <artifactId>spring-boot-dependencies</artifactId>
    <version>2.2.1.RELEASE</version>
    <relativePath>../../spring-boot-dependencies</relativePath>
</parent>
2
3
4
5
6
再点 spring-boot-dependencies 进去,可以发现里面放了很多的依赖和依赖的版本号。由于这个文件实在太长了,所以这里只展示一部分。
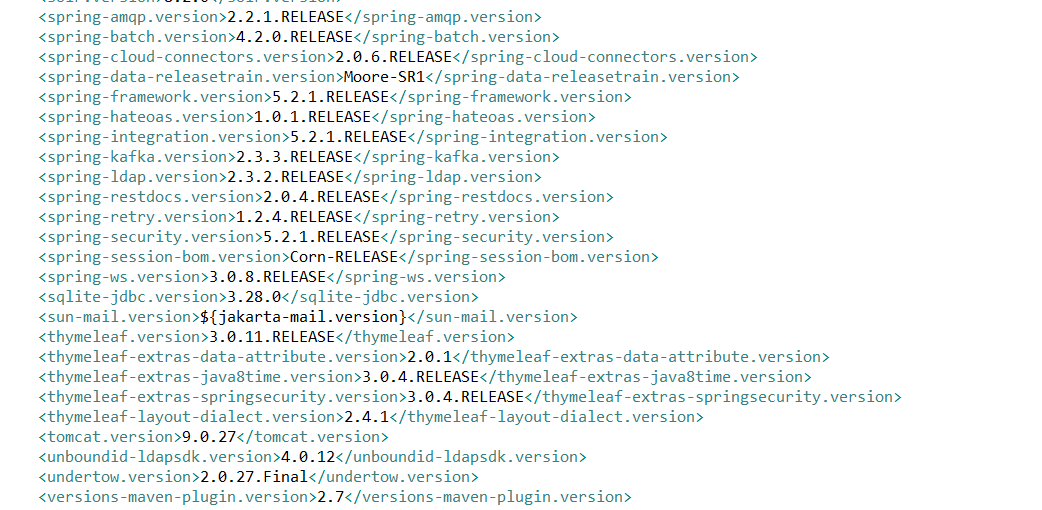
得出第一个结论:
spring-boot-dependencies:作为父工程,存放了SpringBoot的核心依赖。我们在写或者引入一些SpringBoot依赖的时候,不需要指定版本,正是因为SpringBoot的父依赖已经帮我们维护了一套版本。
另外我们还可以看到,在父依赖中也帮我们写好了资源库,不用我们自己再去配置了。
<resources>
      <resource>
        <filtering>true</filtering>
        <directory>${basedir}/src/main/resources</directory>
        <includes>
            <!-- 可以读取的配置文件有
                application.yml/application.yaml/application.properties
            -->
          <include>**/application*.yml</include>
          <include>**/application*.yaml</include>
          <include>**/application*.properties</include>
        </includes>
      </resource>
      <resource>
        <directory>${basedir}/src/main/resources</directory>
        <excludes>
          <exclude>**/application*.yml</exclude>
          <exclude>**/application*.yaml</exclude>
          <exclude>**/application*.properties</exclude>
        </excludes>
      </resource>
</resources>
2
3
4
5
6
7
8
9
10
11
12
13
14
15
16
17
18
19
20
21
22
# 启动器
<dependency>
    <groupId>org.springframework.boot</groupId>
    <artifactId>spring-boot-starter</artifactId>
    <version>2.2.1.RELEASE</version>
</dependency>COPY
2
3
4
5
启动器就是SpringBoot的启动场景,比如我们要使用web相关的,那么就直接引入spring-boot-starter-web,那么他就会帮我们自动导入web环境下所有必需的依赖。
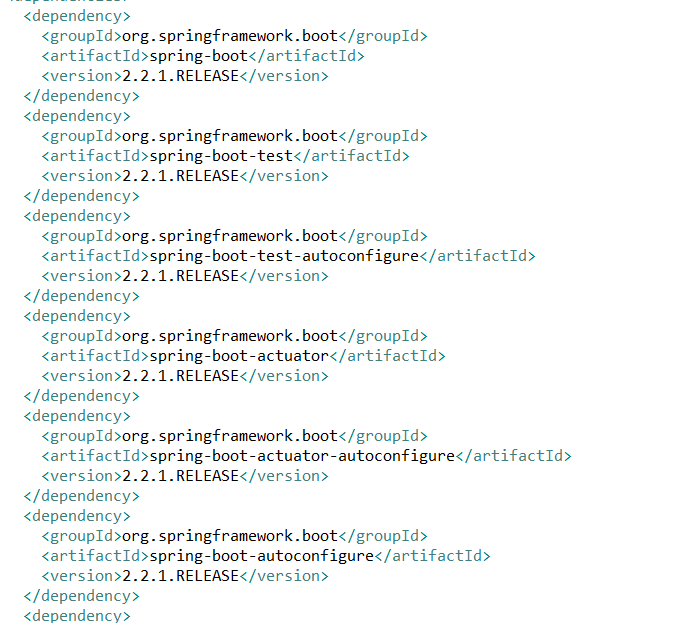
我们来看看启动器中存放了一些什么内容:
以spring-boot-starter为例:
<dependency>
      <groupId>org.springframework.boot</groupId>
      <artifactId>spring-boot</artifactId>
      <version>2.2.1.RELEASE</version>
      <scope>compile</scope>
    </dependency>
    <dependency>
      <groupId>org.springframework.boot</groupId>
      <artifactId>spring-boot-autoconfigure</artifactId>
      <version>2.2.1.RELEASE</version>
      <scope>compile</scope>
    </dependency>
    <dependency>
      <groupId>org.springframework.boot</groupId>
      <artifactId>spring-boot-starter-logging</artifactId>
      <version>2.2.1.RELEASE</version>
      <scope>compile</scope>
    </dependency>
    <dependency>
      <groupId>jakarta.annotation</groupId>
      <artifactId>jakarta.annotation-api</artifactId>
      <version>1.3.5</version>
      <scope>compile</scope>
    </dependency>
    <dependency>
      <groupId>org.springframework</groupId>
      <artifactId>spring-core</artifactId>
      <version>5.2.1.RELEASE</version>
      <scope>compile</scope>
    </dependency>
    <dependency>
      <groupId>org.yaml</groupId>
      <artifactId>snakeyaml</artifactId>
      <version>1.25</version>
      <scope>runtime</scope>
    </dependency>COPY
2
3
4
5
6
7
8
9
10
11
12
13
14
15
16
17
18
19
20
21
22
23
24
25
26
27
28
29
30
31
32
33
34
35
36
其中存放了自动配置相关的依赖、日志相关依赖、还有Spring-core等依赖,这些依赖我们只需要导入一个spring-boot-starter就可以直接将其全部引入,而不需要再像以前那样逐个导入了。
SpringBoot会将所有的功能场景都封装成一个一个的启动器,供开发人员使用。
我们在使用的时候也可以直接去官网上找我们所需的启动器,直接将其引入。
# 主程序
//@SpringBootApplication 标注,是一个SpringBoot应用
@SpringBootApplication
public class SpringbootdemoApplication {
    public static void main(String[] args) {
        SpringApplication.run(SpringbootdemoApplication.class, args);
    }
}COPY
2
3
4
5
6
7
再写SpringBoot项目的时候,总要写这么一个主程序,这个主程序最大的特点就是其类上放了一个@SpringBootApplication注解,这也正是SpringBoot项目启动的核心,也是我们要研究的重点。
# 核心注解 SpringBootApplication
点开@SpringBootApplication,可以发现它是一个组合注解:
@Target({ElementType.TYPE})
@Retention(RetentionPolicy.RUNTIME)
@Documented
@Inherited
<1.>@SpringBootConfiguration
<2.>@ComponentScan(
    excludeFilters = {@Filter(
    type = FilterType.CUSTOM,
    classes = {TypeExcludeFilter.class}
), @Filter(
    type = FilterType.CUSTOM,
    classes = {AutoConfigurationExcludeFilter.class}
)}
)
<3.>@EnableAutoConfiguration
public @interface SpringBootApplication {

}

@Target({ElementType.TYPE})
@Retention(RetentionPolicy.RUNTIME)
@Documented
@Configuration //实际上它也是一个配置类
public @interface SpringBootConfiguration {
}
2
3
4
5
6
7
8
9
10
11
12
13
14
15
16
17
18
19
20
21
22
23
24
25
大概可以把 @SpringBootApplication看作是 @Configuration、@EnableAutoConfiguration、@ComponentScan 注解的集合。根据 SpringBoot 官网,这三个注解的作用分别是:
@EnableAutoConfiguration:启用 SpringBoot 的自动配置机制@Configuration:允许在上下文中注册额外的 bean 或导入其他配置类@ComponentScan: 扫描被@Component(@Service,@Controller)注解的 bean,注解默认会扫描启动类所在的包下所有的类 ,可以自定义不扫描某些 bean。
@EnableAutoConfiguration 是实现自动装配的重要注解,我们以从这个注解入手。
# @EnableAutoConfiguration:实现自动装配的核心注解
EnableAutoConfiguration 只是一个简单地注解,自动装配核心功能的实现实际是通过 AutoConfigurationImportSelector类。
@Target({ElementType.TYPE})
@Retention(RetentionPolicy.RUNTIME)
@Documented
@Inherited
@AutoConfigurationPackage //作用:将main包下的所有组件注册到容器中
@Import({AutoConfigurationImportSelector.class}) //加载自动装配类 xxxAutoconfiguration
public @interface EnableAutoConfiguration {
    String ENABLED_OVERRIDE_PROPERTY = "spring.boot.enableautoconfiguration";

    Class<?>[] exclude() default {};

    String[] excludeName() default {};
}
2
3
4
5
6
7
8
9
10
11
12
13
我们现在重点分析下AutoConfigurationImportSelector 类到底做了什么?
# AutoConfigurationImportSelector:加载自动装配类
AutoConfigurationImportSelector,这个类中存在一个方法可以帮我们获取所有的配置,代码如下。
/*
所有的配置都存放在configurations中,
而这些配置都从getCandidateConfiguration中获取,
这个方法是用来获取候选的配置。
*/
List<String> configurations = getCandidateConfigurations(annotationMetadata, attributes);COPY
2
3
4
5
6
# getAutoConfigurationEntry():
AutoConfigurationImportSelector类的继承体系如下:
public class AutoConfigurationImportSelector implements DeferredImportSelector, BeanClassLoaderAware, ResourceLoaderAware, BeanFactoryAware, EnvironmentAware, Ordered {

}

public interface DeferredImportSelector extends ImportSelector {

}

public interface ImportSelector {
    String[] selectImports(AnnotationMetadata var1);
}
2
3
4
5
6
7
8
9
10
11
可以看出,AutoConfigurationImportSelector 类实现了 ImportSelector接口,也就实现了这个接口中的 selectImports方法,该方法主要用于获取所有符合条件的类的全限定类名,这些类需要被加载到 IoC 容器中。
private static final String[] NO_IMPORTS = new String[0];

public String[] selectImports(AnnotationMetadata annotationMetadata) {
        // <1>.判断自动装配开关是否打开
        if (!this.isEnabled(annotationMetadata)) {
            return NO_IMPORTS;
        } else {
          //<2>.获取所有需要装配的bean
            AutoConfigurationMetadata autoConfigurationMetadata = AutoConfigurationMetadataLoader.loadMetadata(this.beanClassLoader);
            AutoConfigurationImportSelector.AutoConfigurationEntry autoConfigurationEntry = this.getAutoConfigurationEntry(autoConfigurationMetadata, annotationMetadata);
            return StringUtils.toStringArray(autoConfigurationEntry.getConfigurations());
        }
    }
2
3
4
5
6
7
8
9
10
11
12
13
这里我们需要重点关注一下getAutoConfigurationEntry()方法,这个方法主要负责获取所有候选的配置。
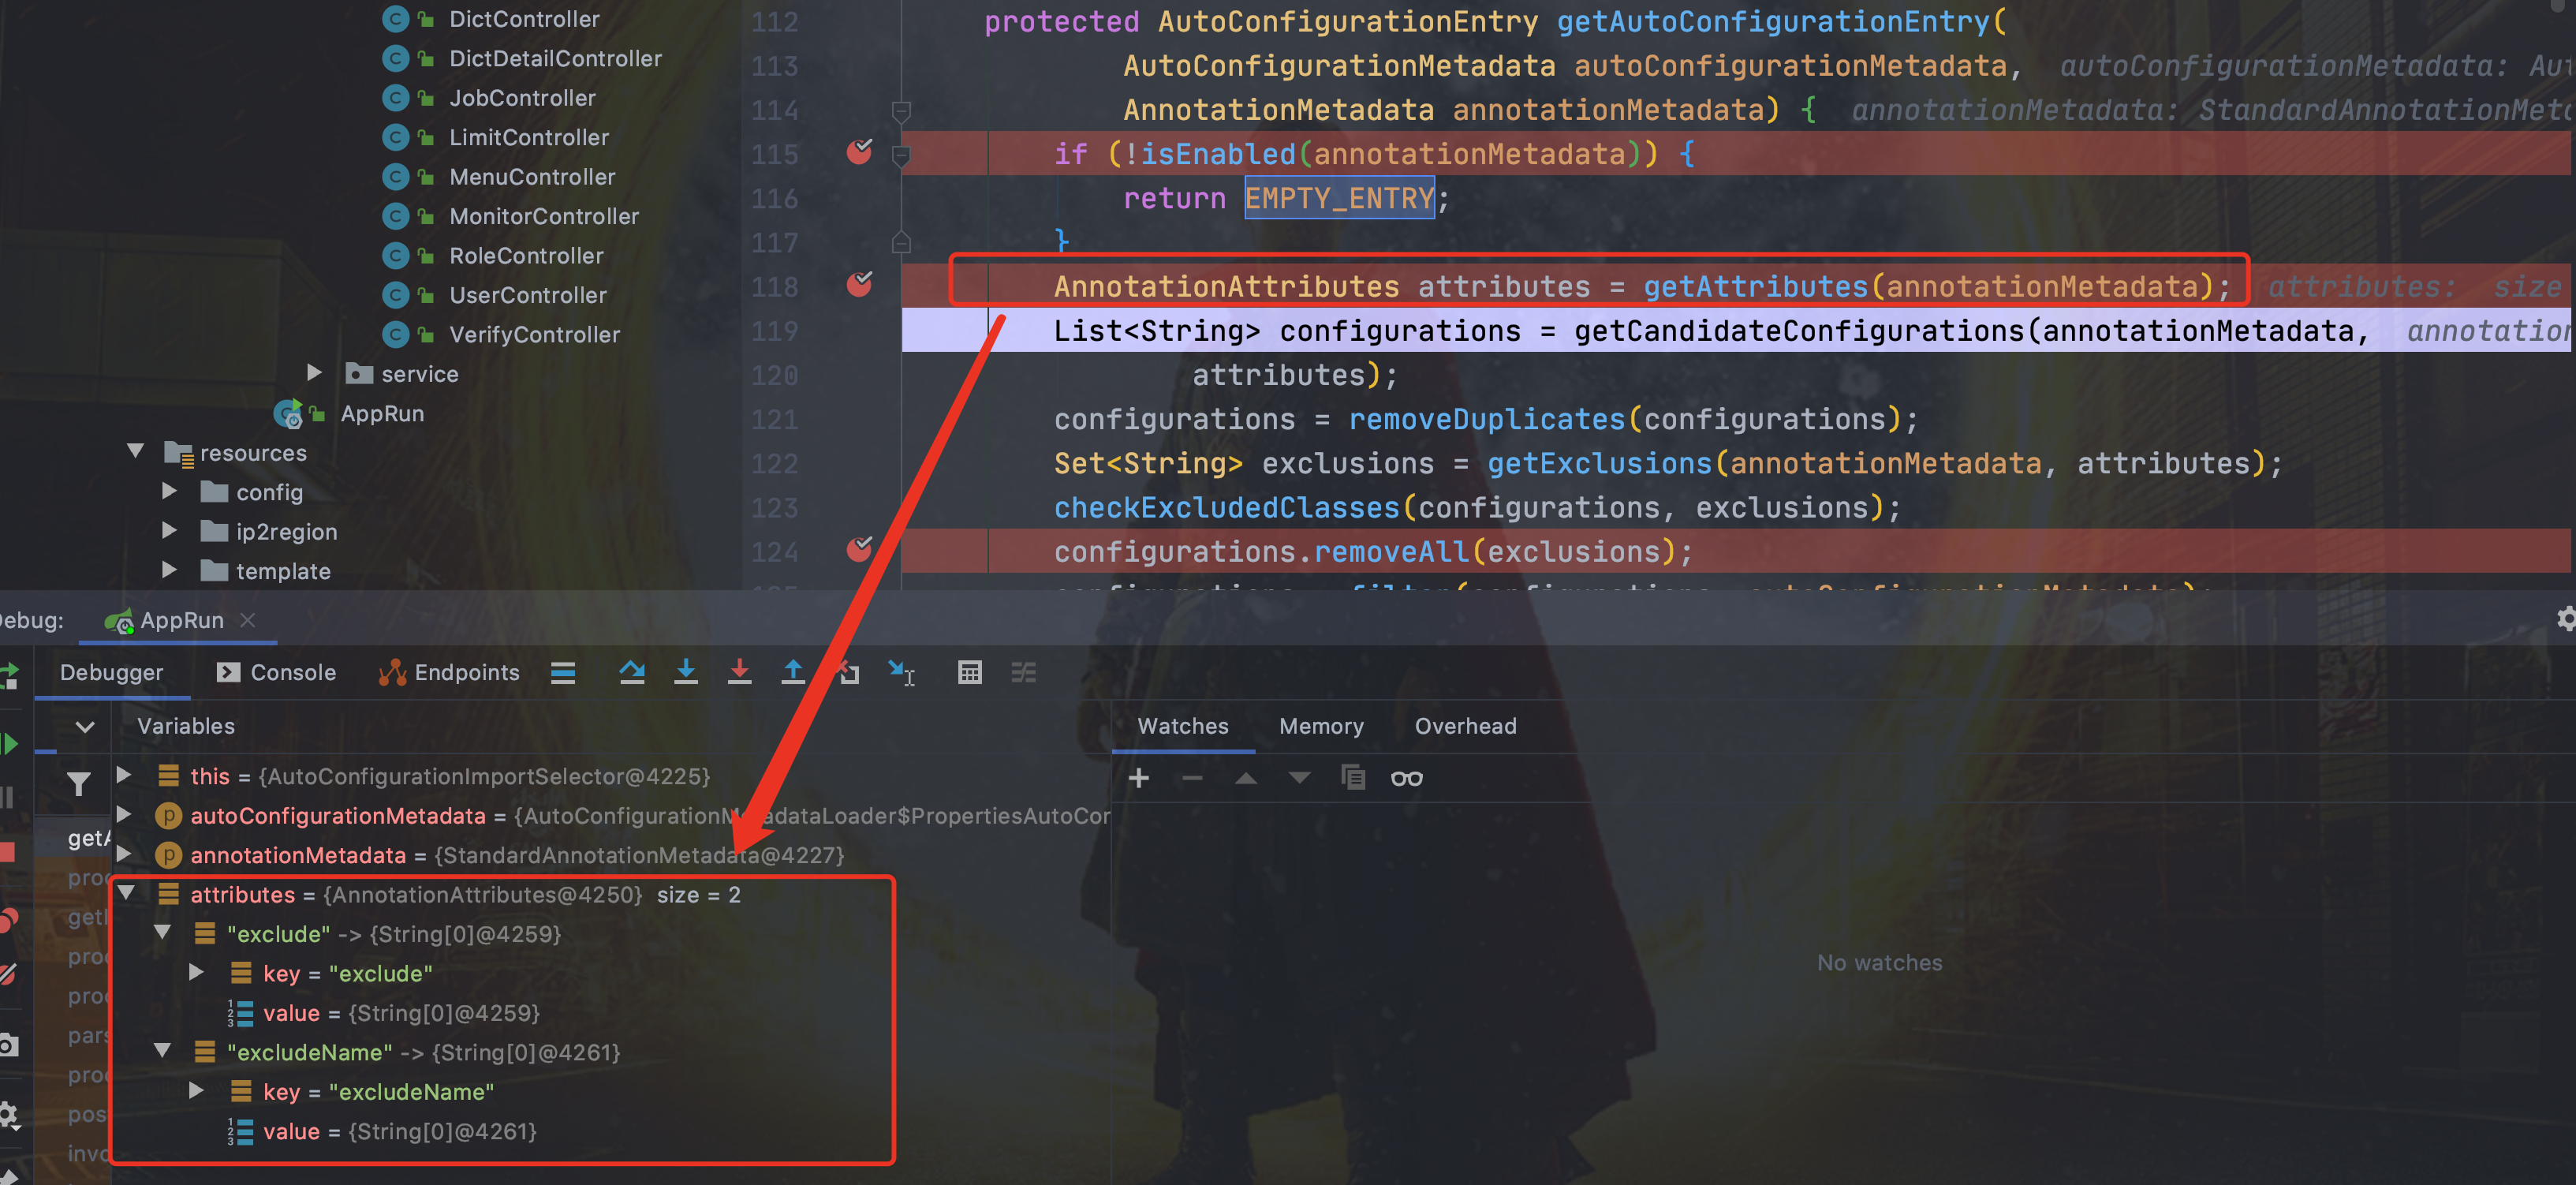
getAutoConfigurationEntry()的源码:
private static final AutoConfigurationEntry EMPTY_ENTRY = new AutoConfigurationEntry();

AutoConfigurationEntry getAutoConfigurationEntry(AutoConfigurationMetadata autoConfigurationMetadata, AnnotationMetadata annotationMetadata) {
        //<1>. 判断自动装配开关是否打开
        if (!this.isEnabled(annotationMetadata)) {
            return EMPTY_ENTRY;
        } else {
            //<2>. 用于获取EnableAutoConfiguration注解 中的 exclude 和 excludeName
            AnnotationAttributes attributes = this.getAttributes(annotationMetadata);
            //<3>. 获取需要自动装配的所有配置类,读取META-INF/spring.factories
            List<String> configurations = this.getCandidateConfigurations(annotationMetadata, attributes);
            //<4>. 按需加载配置
            configurations = this.removeDuplicates(configurations);
            Set<String> exclusions = this.getExclusions(annotationMetadata, attributes);
            this.checkExcludedClasses(configurations, exclusions);
            configurations.removeAll(exclusions);
            configurations = this.filter(configurations, autoConfigurationMetadata);
            this.fireAutoConfigurationImportEvents(configurations, exclusions);
            return new AutoConfigurationImportSelector.AutoConfigurationEntry(configurations, exclusions);
        }
    }
2
3
4
5
6
7
8
9
10
11
12
13
14
15
16
17
18
19
20
21
# 第 1 步:判断自动装配开关是否打开
默认spring.boot.enableautoconfiguration=true,可在 application.properties 或 application.yml 中设置

# 第 2 步 :用于获取EnableAutoConfiguration注解中的 exclude 和 excludeName
# 第 3 步:获取需要自动装配的所有配置类(重要方法——getCandidateConfigurations())
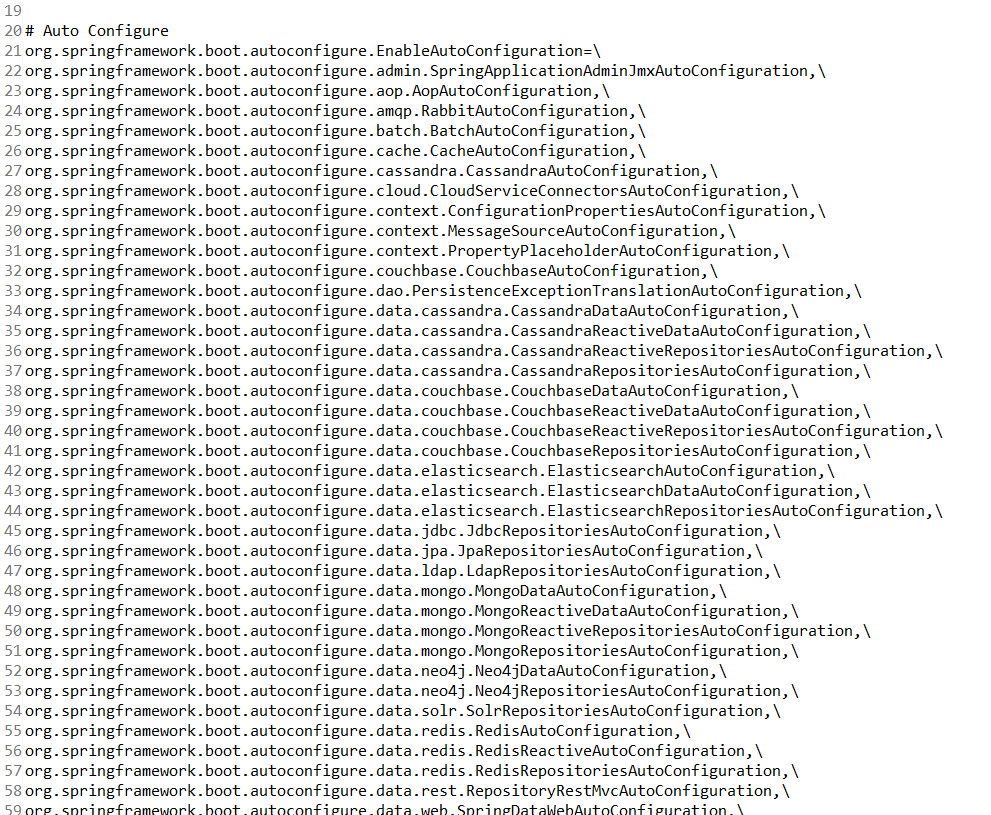
获取需要自动装配的所有配置类,读取META-INF/spring.factories
注意:SpringBoot相关的配置类都在spring-boot-autoconfigure模块下的resources/META-INF/spring.factories。
spring-boot/spring-boot-project/spring-boot-autoconfigure/src/main/resources/META-INF/spring.factories
从下图可以看到这个文件的配置内容都被我们读取到了。XXXAutoConfiguration的作用就是按需加载组件。
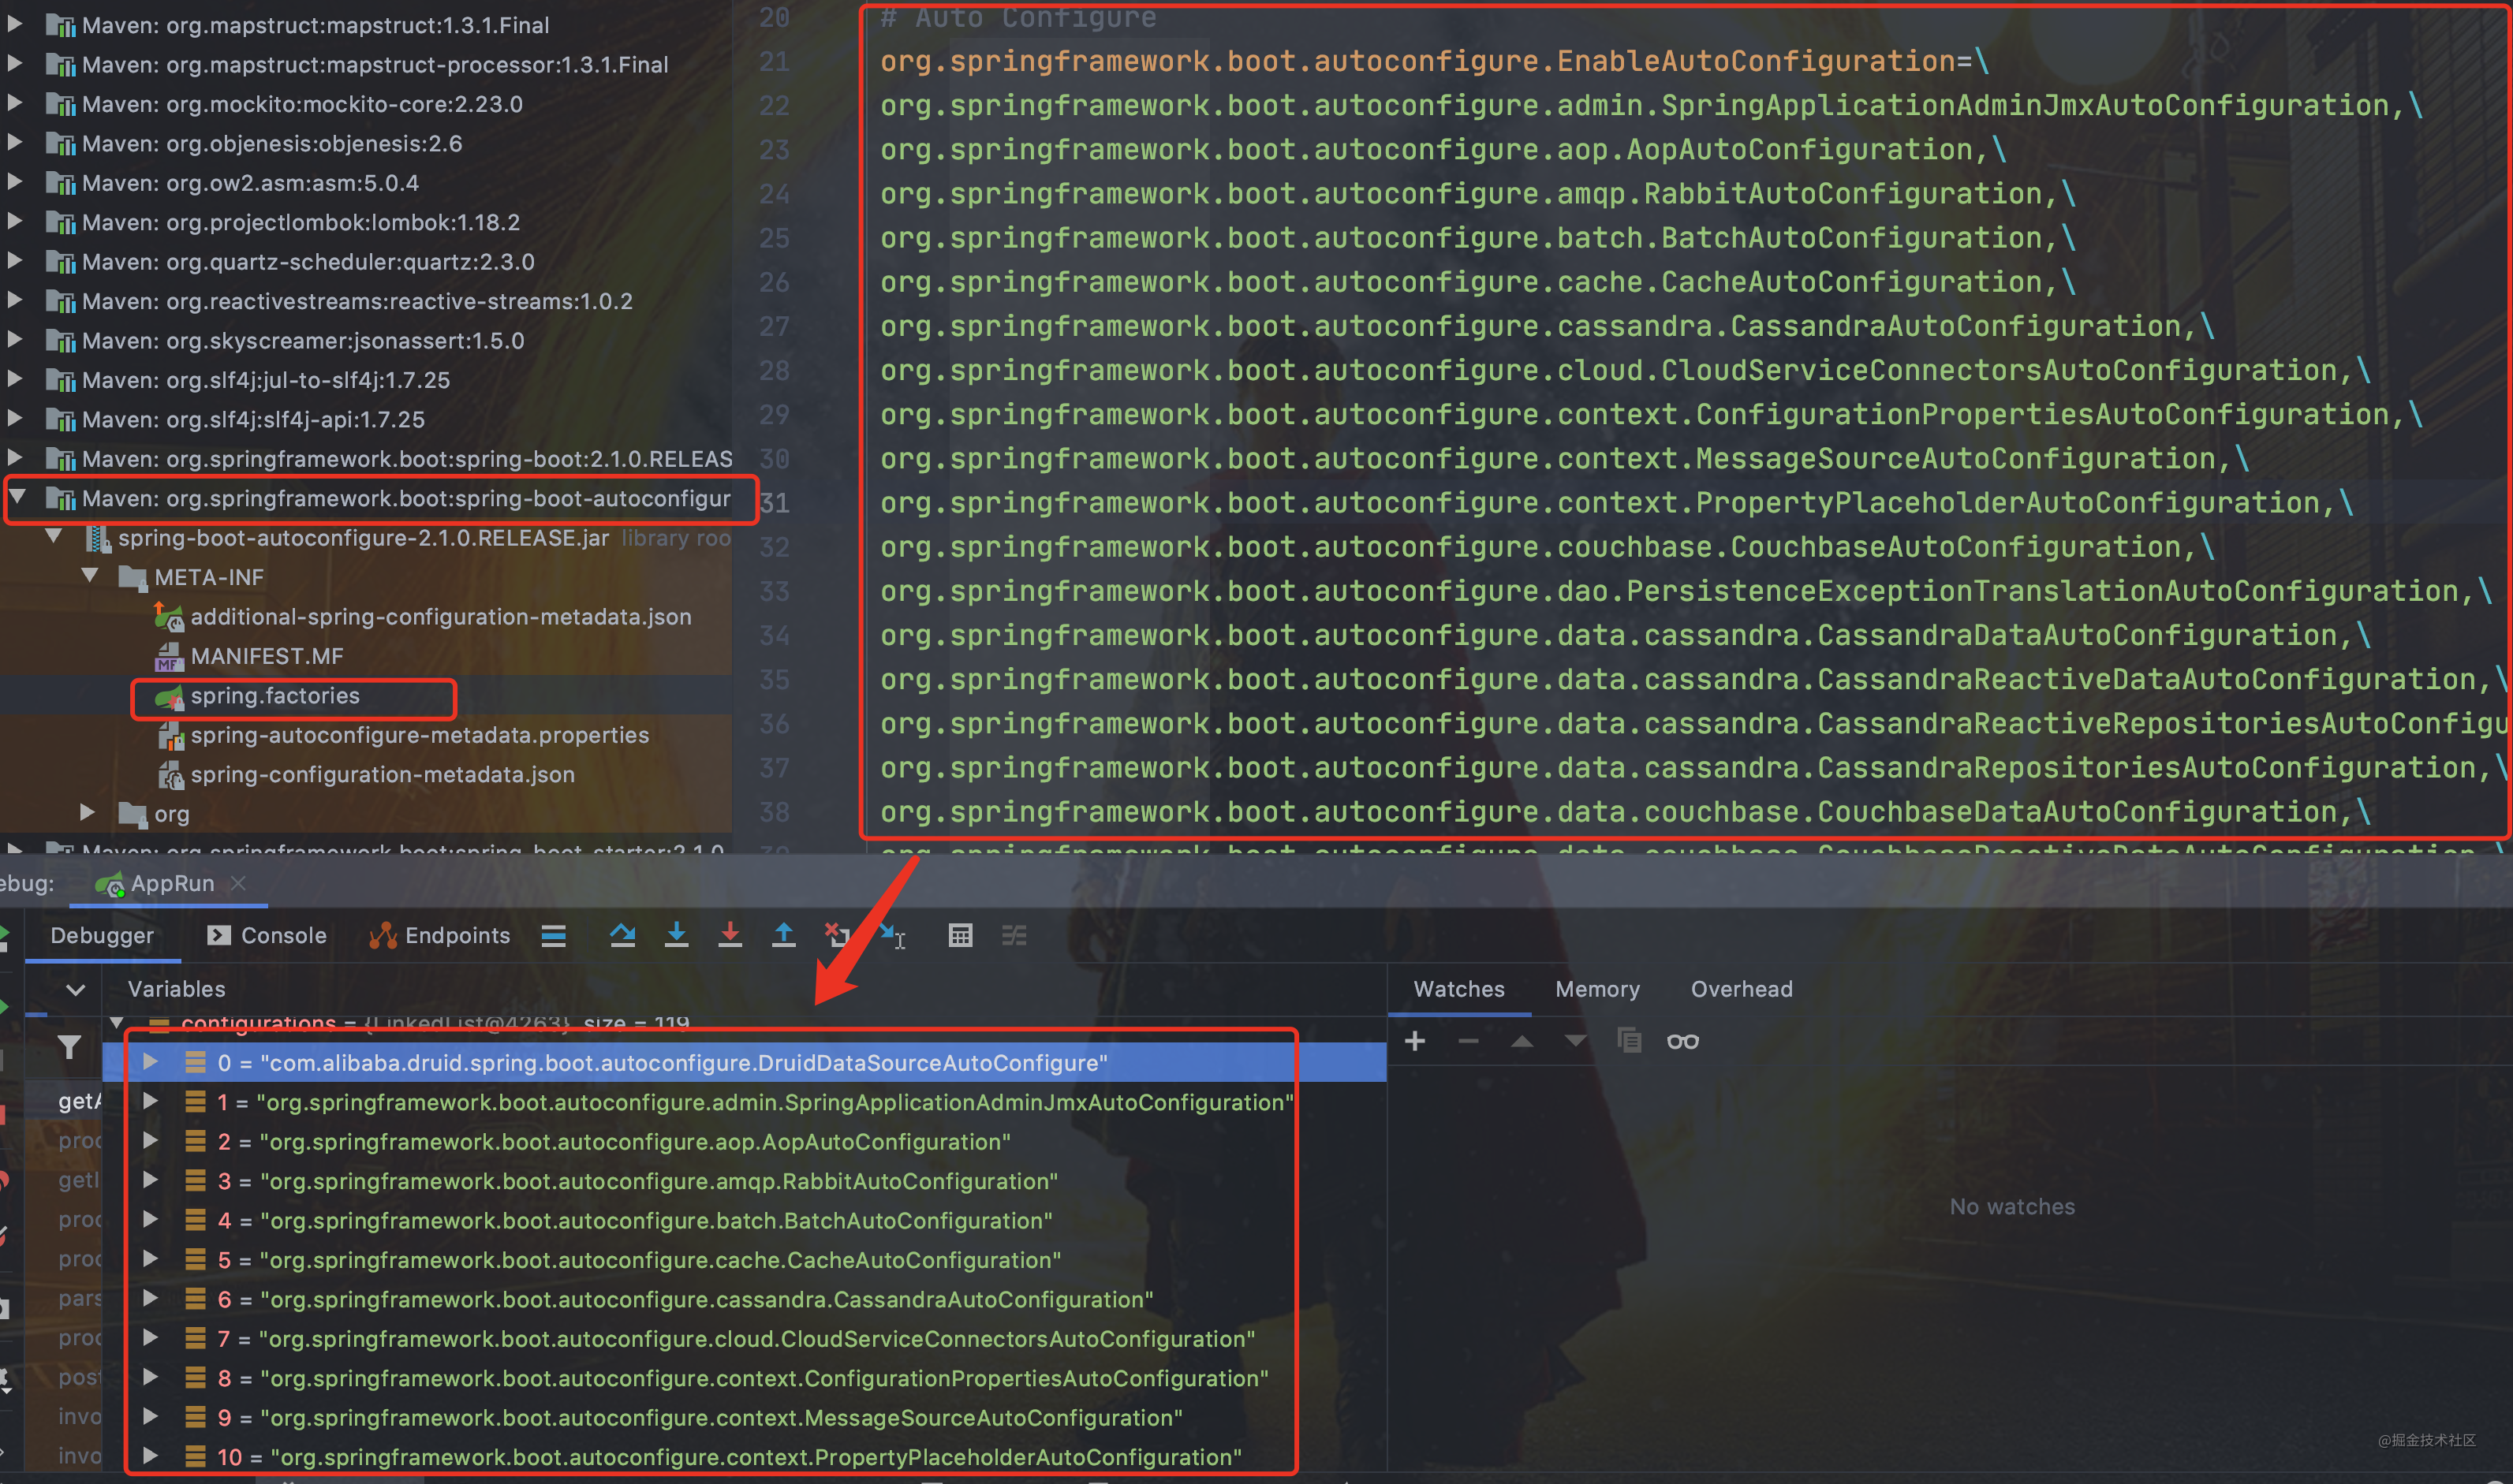
不光是这个依赖下的META-INF/spring.factories被读取到,所有 Spring Boot Starter 下的META-INF/spring.factories都会被读取到。
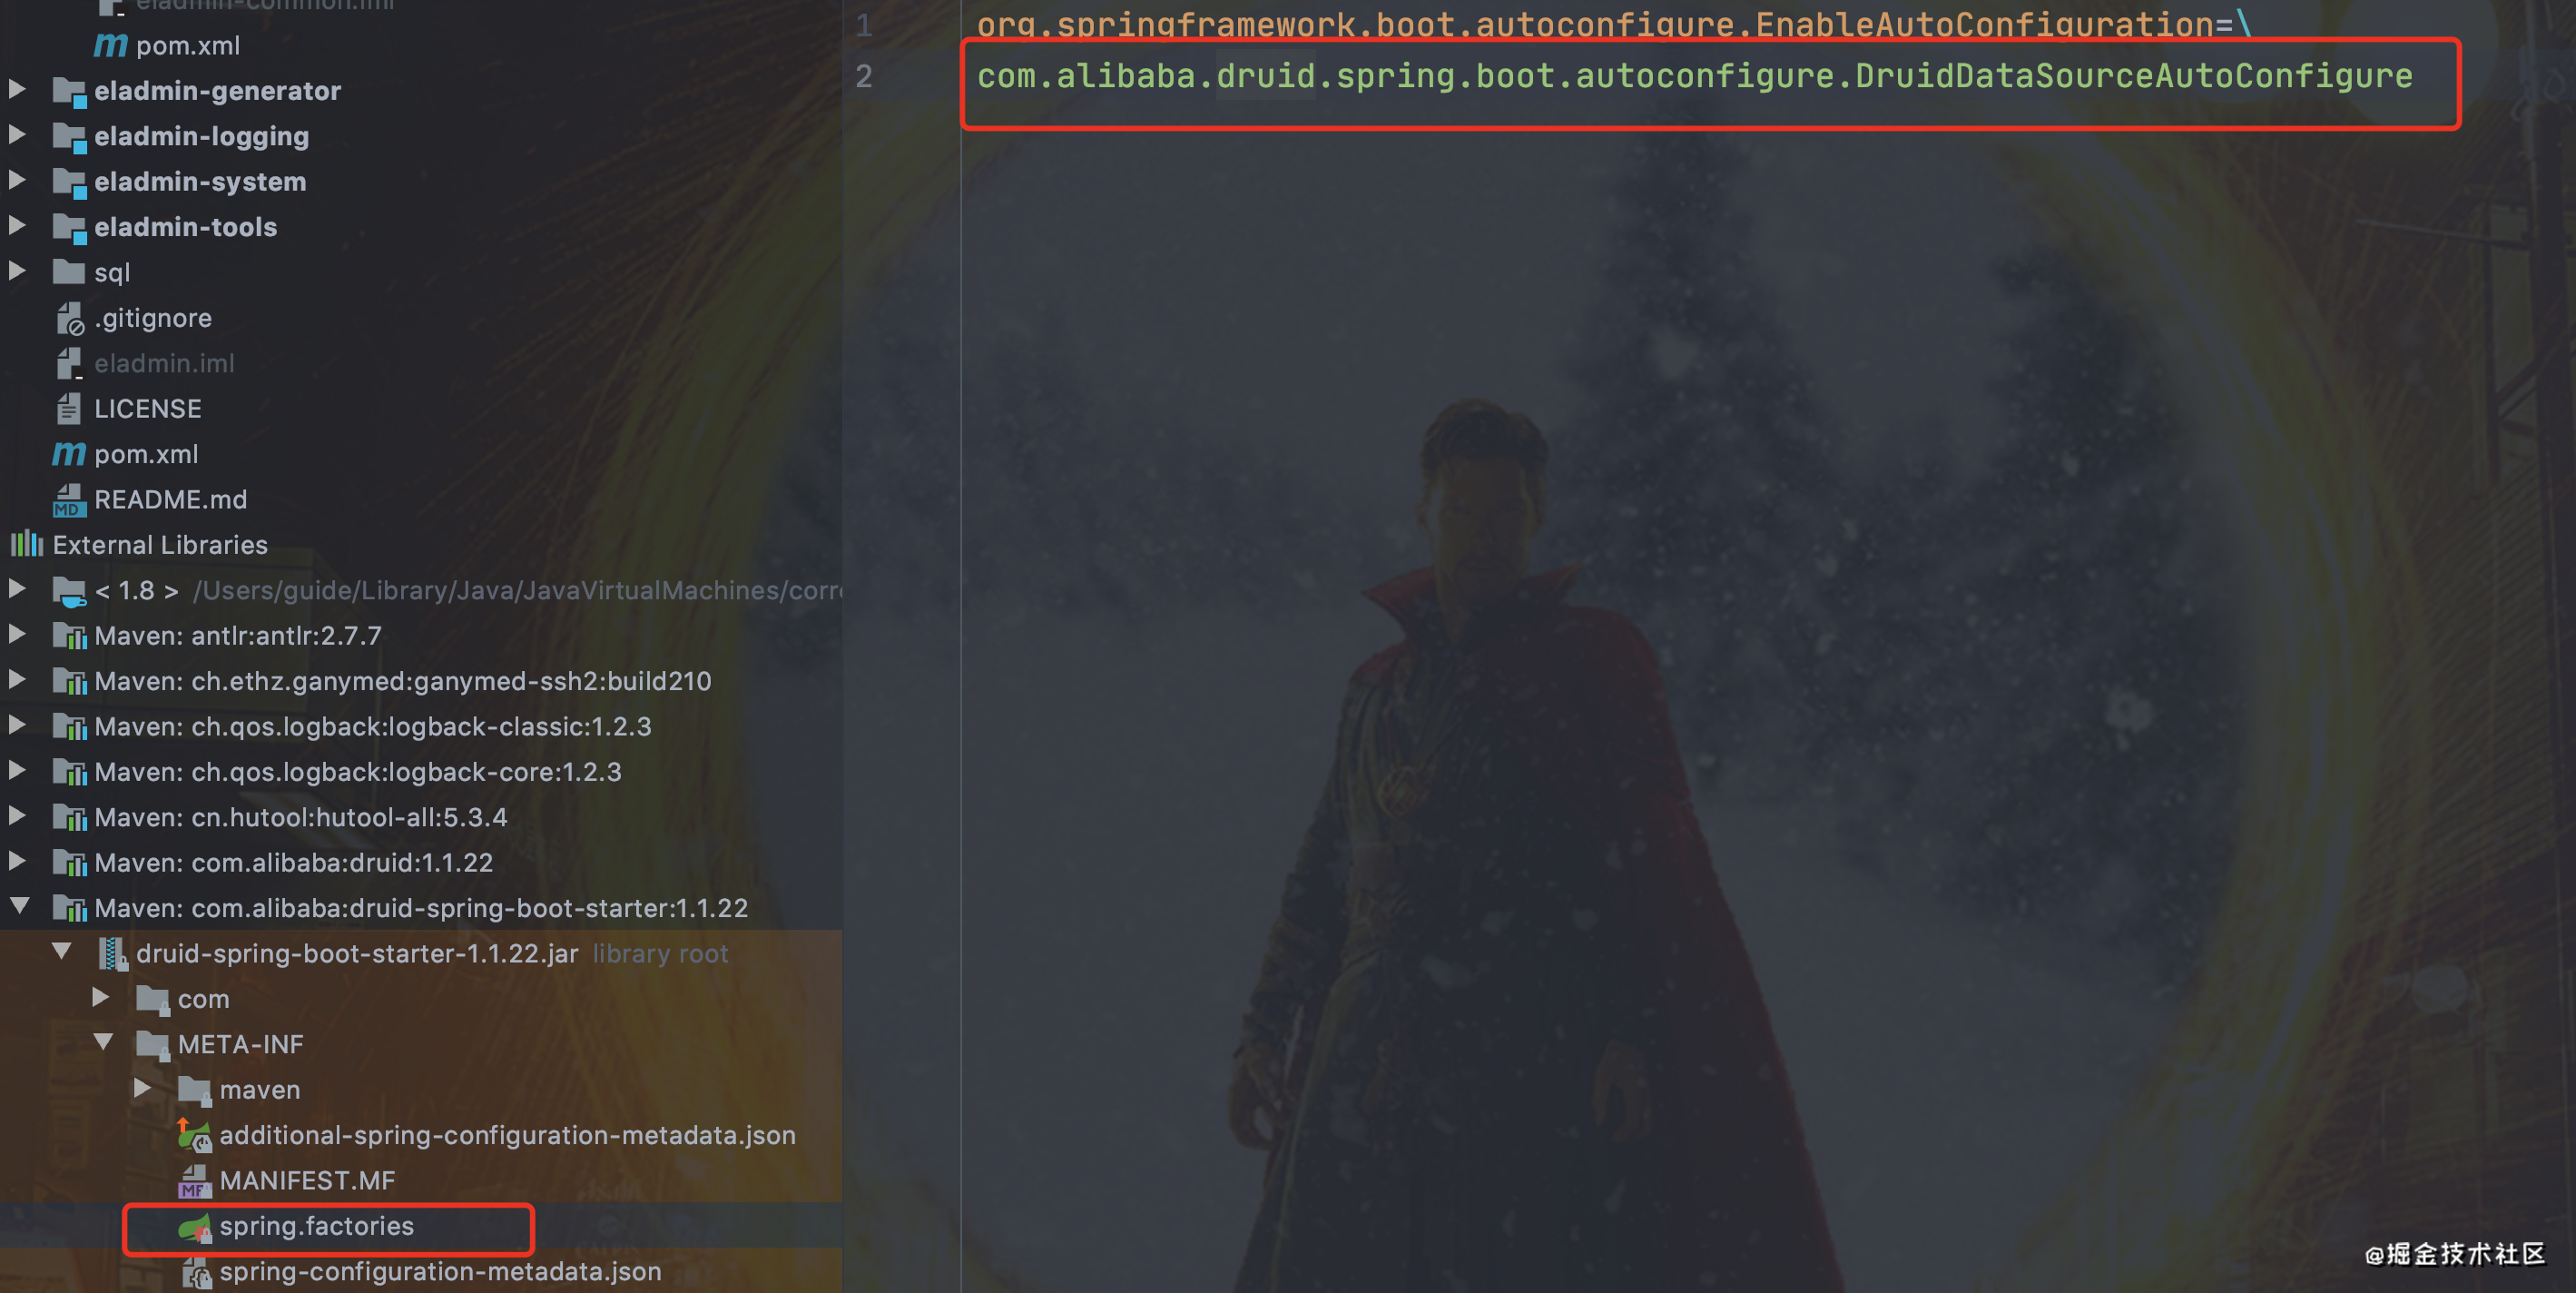
所以,你可以清楚滴看到, druid 数据库连接池的 Spring Boot Starter 就创建了META-INF/spring.factories文件。
如果,我们自己要创建一个 Spring Boot Starter,这一步是必不可少的。
# getCandidateConfigurations() 详细分析
这个方法可以用来获取所有候选的配置,那么这些候选的配置又是从哪来的呢?
   /*获取候选的配置*/
   protected List<String> getCandidateConfigurations(AnnotationMetadata metadata, AnnotationAttributes attributes) {
        List<String> configurations = SpringFactoriesLoader.loadFactoryNames(getSpringFactoriesLoaderFactoryClass(),
                getBeanClassLoader());
        Assert.notEmpty(configurations, "No auto configuration classes found in META-INF/spring.factories. If you "
                + "are using a custom packaging, make sure that file is correct.");
        return configurations;
    }COPY
2
3
4
5
6
7
8
实际上它返回了一个List,这个List是由**loadFactoryNames()**方法返回的,其中传入了一个getSpringFactoriesLoaderFactoryClass(),我们可以看看这个方法的内容。
   protected Class<?> getSpringFactoriesLoaderFactoryClass() {
    return EnableAutoConfiguration.class;
   }COPY
2
3
我们看到了一个眼熟的词 —— EnableAutoConfiguration,也就是说,它实际上返回的就是标注了这个类的所有包。标注了这个类的包不就是@SpringBootApplication吗?
所以我们可以得出结论:它兜兜转转饶了这么多地方,就是为了将启动类所需的所有资源导入。
我们接着往下看,它其中还有这么一条语句,是一条断言:
   Assert.notEmpty(configurations, "No auto configuration classes found in META-INF/spring.factories. If you "
                + "are using a custom packaging, make sure that file is correct.");COPY
2
这个断言的意思是,configurations必须非空,否则就打印一段话,No auto configuration classes found in META-INF/spring.factories,我们把这个逻辑反过来想想。如果这个集合不为空,是不是就代表找到了这个spring.factories并且会去加载这个文件中的内容呢?
带着这个疑问,我们首先找到spring.factories这个文件:
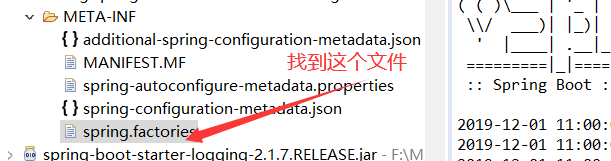
可以看到里面包含了很多自动配置属性:
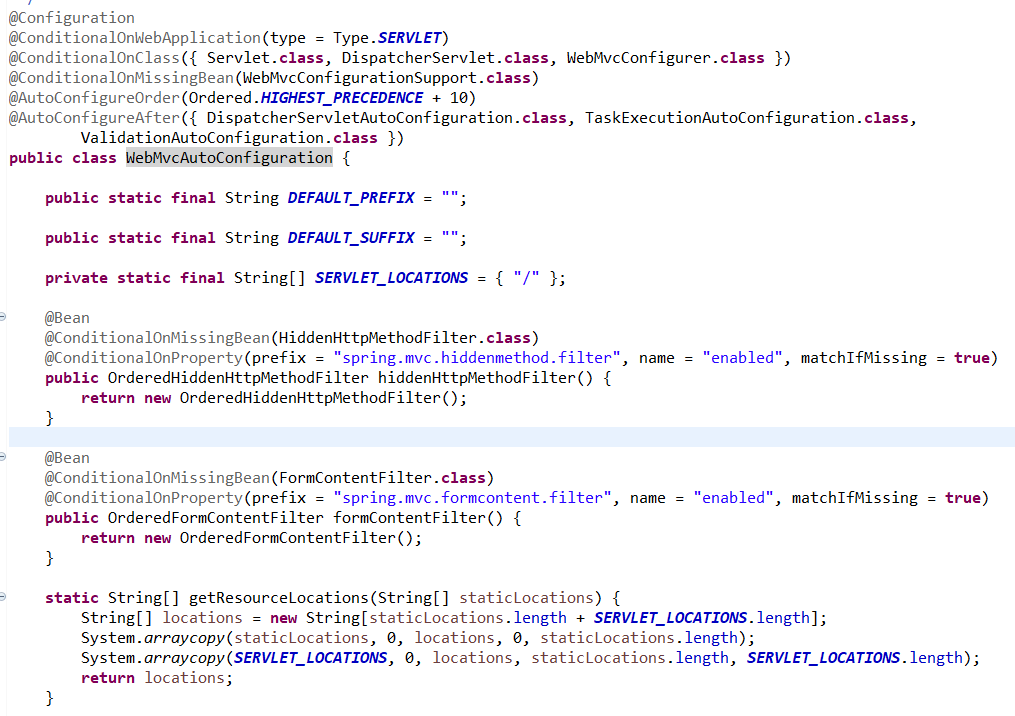
我们可以随便找一个自动配置点进去,比如**WebMvcAutoConfiguration**:
# 第 4 步 :@ConditionalOnXXX按需加载
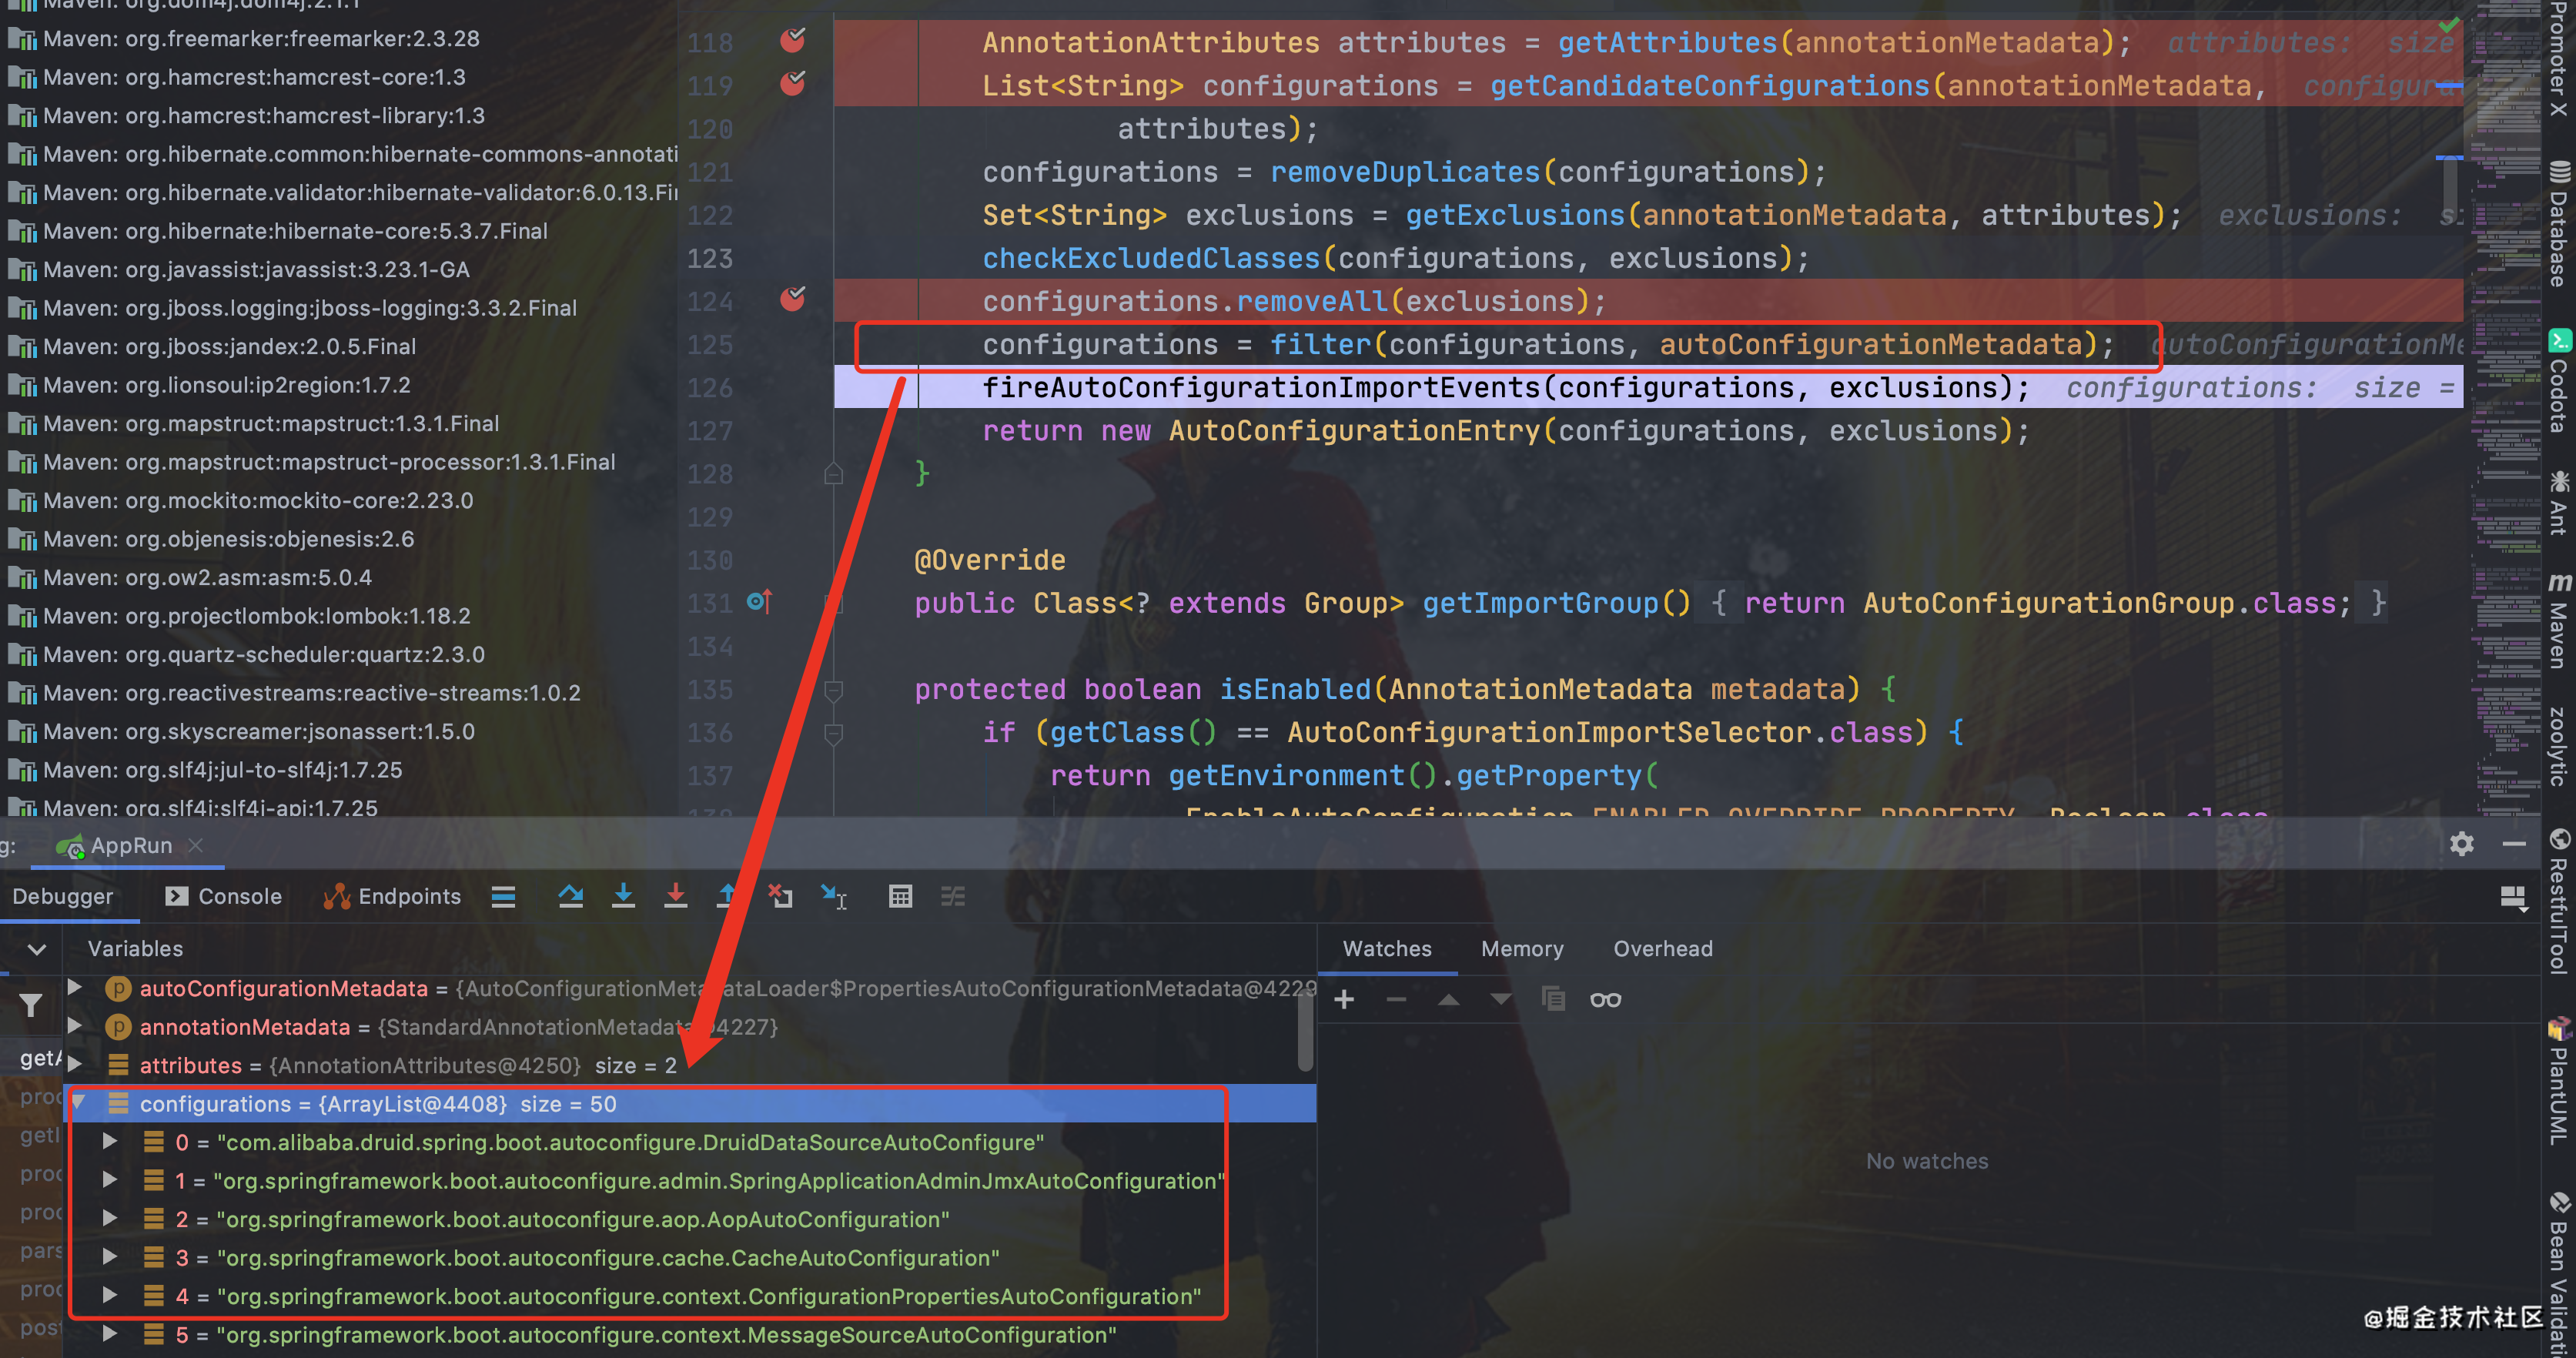
到这里可能面试官会问你:“spring.factories中这么多配置,每次启动都要全部加载么?”。
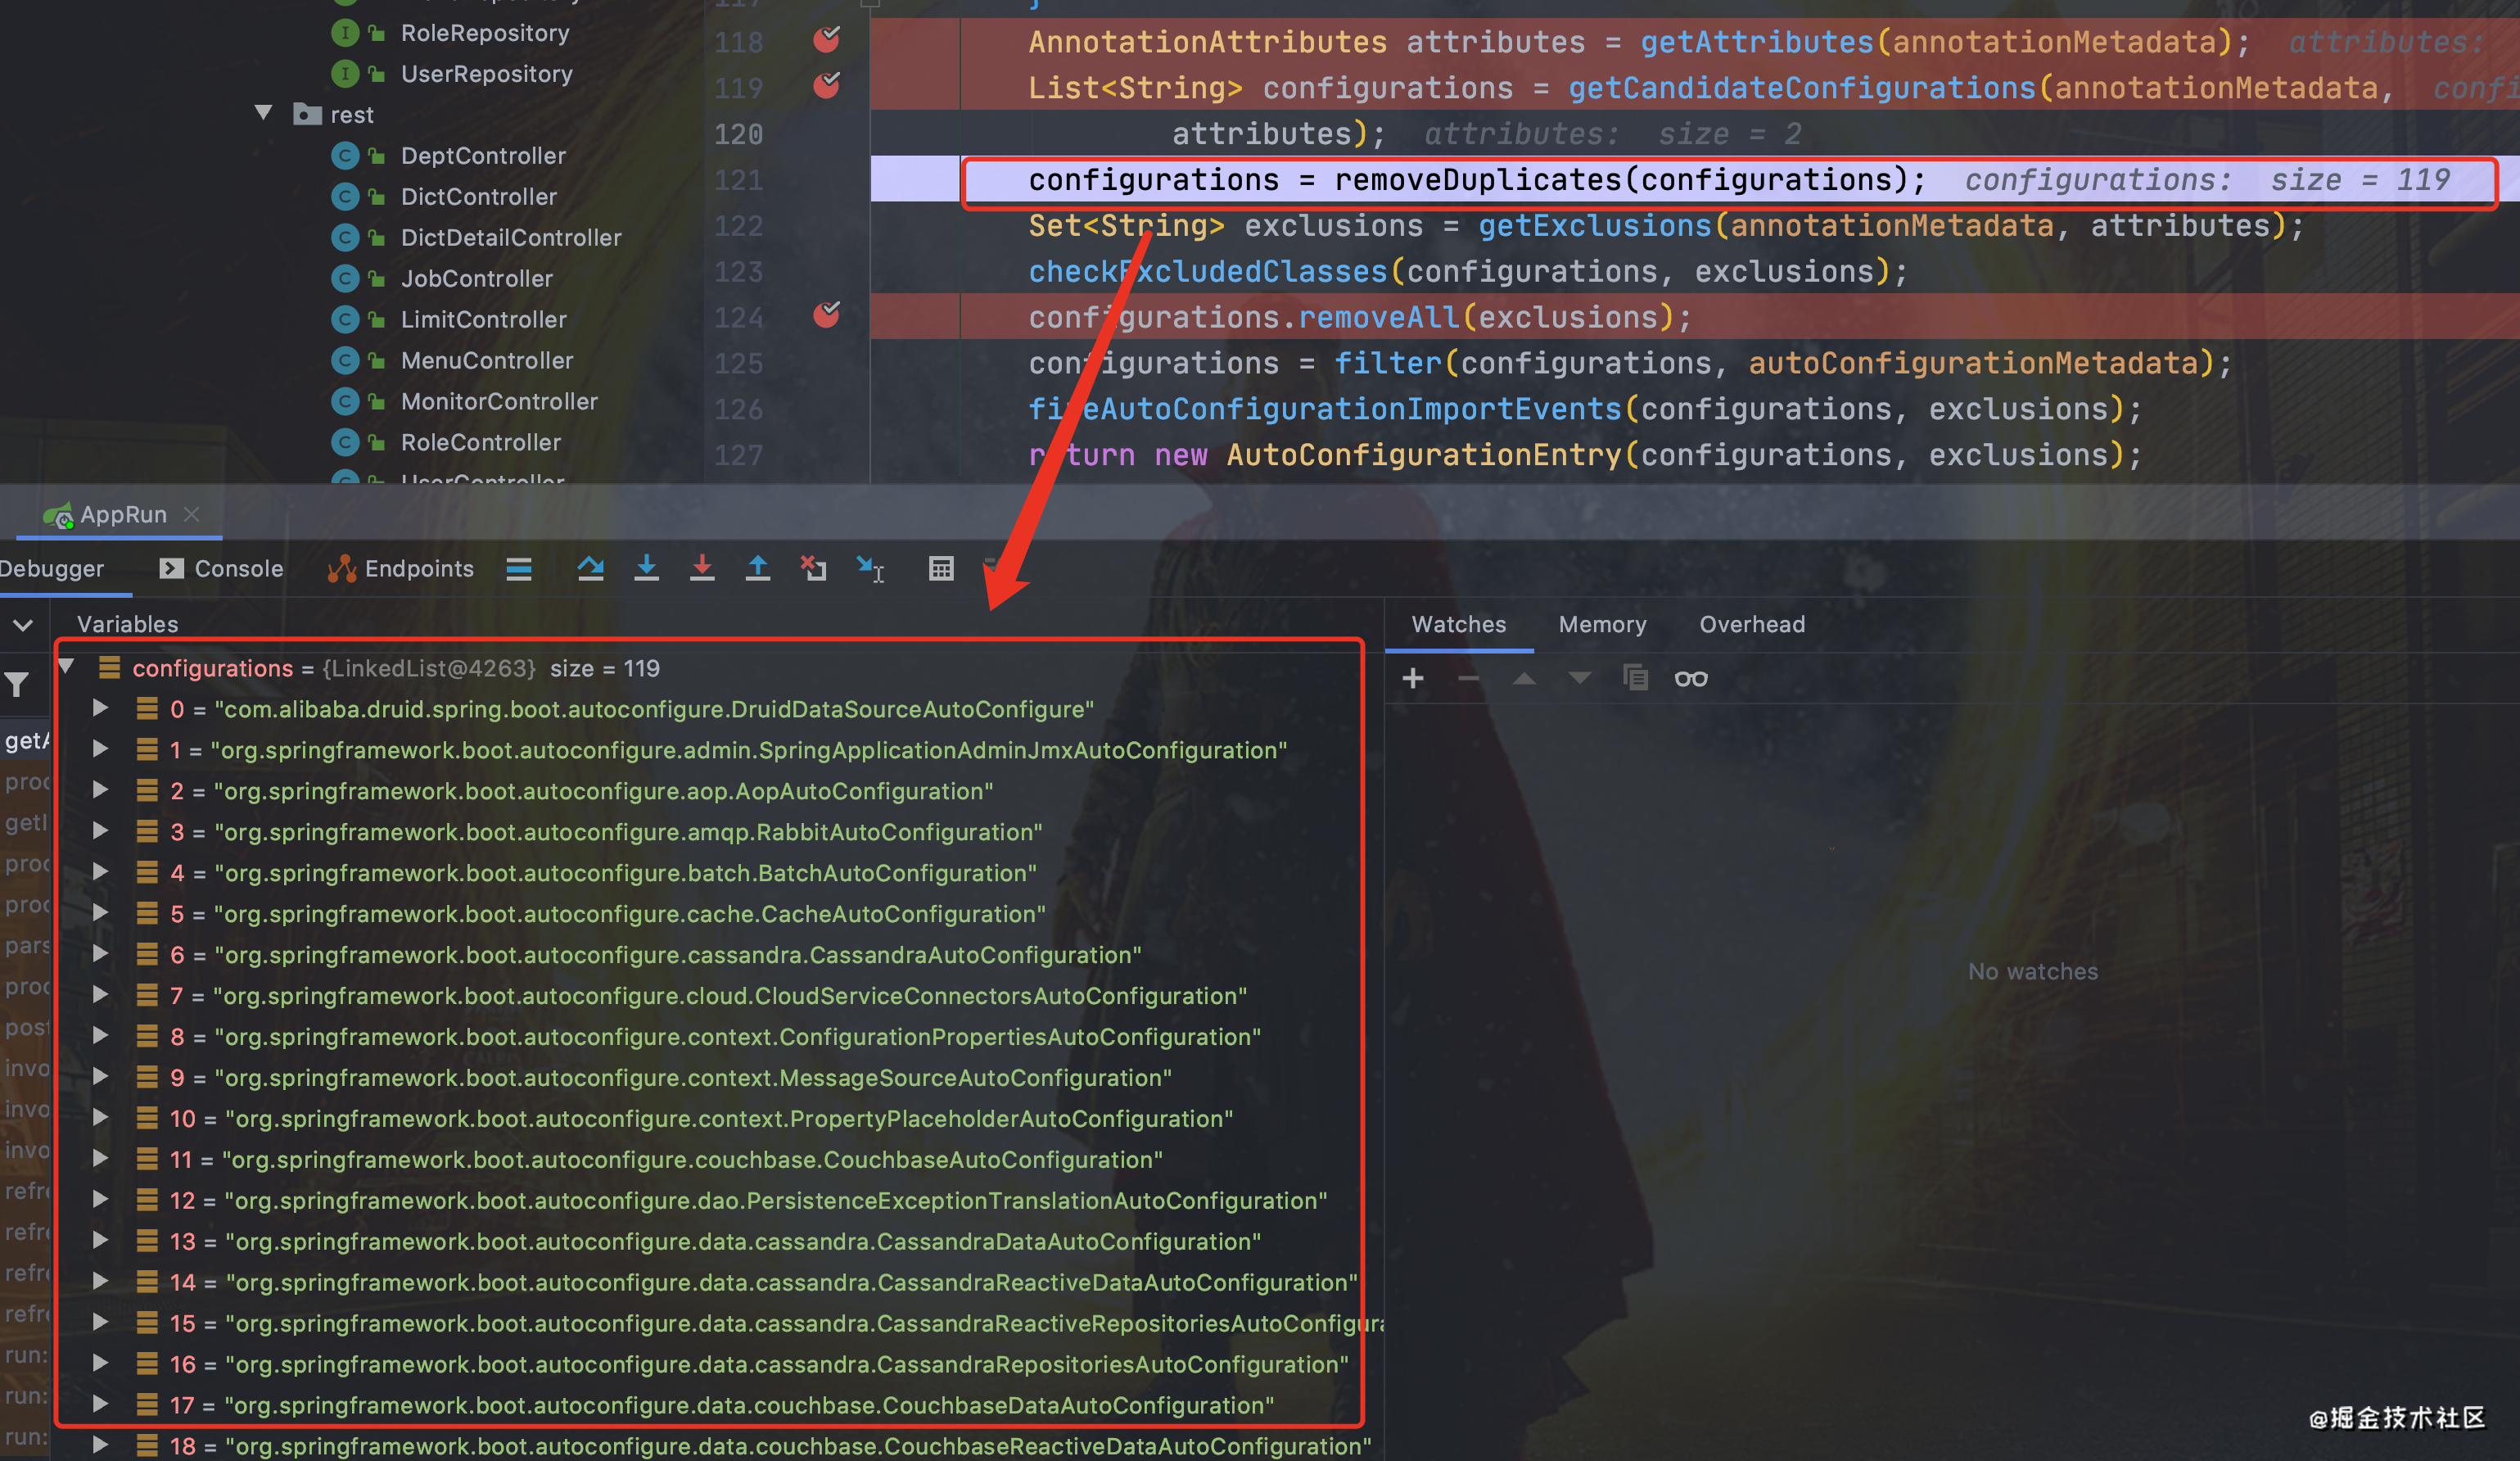
很明显,这是不现实的。我们 debug 到后面你会发现,configurations 的值变小了。
这其实也是我在看源码的时候存在疑问的地方,因为其中有一个注解并不常用,我们点开一个配置类就可以看到。

因为,这一步有经历了一遍筛选,@ConditionalOnXXX 中的所有条件都满足,该类才会生效。
@Configuration
// 检查相关的类:RabbitTemplate 和 Channel是否存在
// 存在才会加载
@ConditionalOnClass({ RabbitTemplate.class, Channel.class })
@EnableConfigurationProperties(RabbitProperties.class)
@Import(RabbitAnnotationDrivenConfiguration.class)
public class RabbitAutoConfiguration {
}
2
3
4
5
6
7
8
所以在加载自动配置类的时候,并不是将spring.factories的配置全量加载进来,而是通过这个注解的判断,如果注解中的类都存在,才会进行加载。
所以就实现了:我们在pom.xml文件中加入stater启动器,SpringBoot自动进行配置。完成开箱即用。
有兴趣的可以详细了解下 Spring Boot 提供的条件注解:
@ConditionalOnBean:当容器里有指定 Bean 的条件下@ConditionalOnMissingBean:当容器里没有指定 Bean 的情况下@ConditionalOnSingleCandidate:当指定 Bean 在容器中只有一个,或者虽然有多个但是指定首选 Bean@ConditionalOnClass:当类路径下有指定类的条件下@ConditionalOnMissingClass:当类路径下没有指定类的条件下@ConditionalOnProperty:指定的属性是否有指定的值@ConditionalOnResource:类路径是否有指定的值@ConditionalOnExpression:基于 SpEL 表达式作为判断条件@ConditionalOnJava:基于 Java 版本作为判断条件@ConditionalOnJndi:在 JNDI 存在的条件下差在指定的位置@ConditionalOnNotWebApplication:当前项目不是 Web 项目的条件下@ConditionalOnWebApplication:当前项目是 Web 项 目的条件下
可参看:一文了解ConfigurationConditon接口 (opens new window)
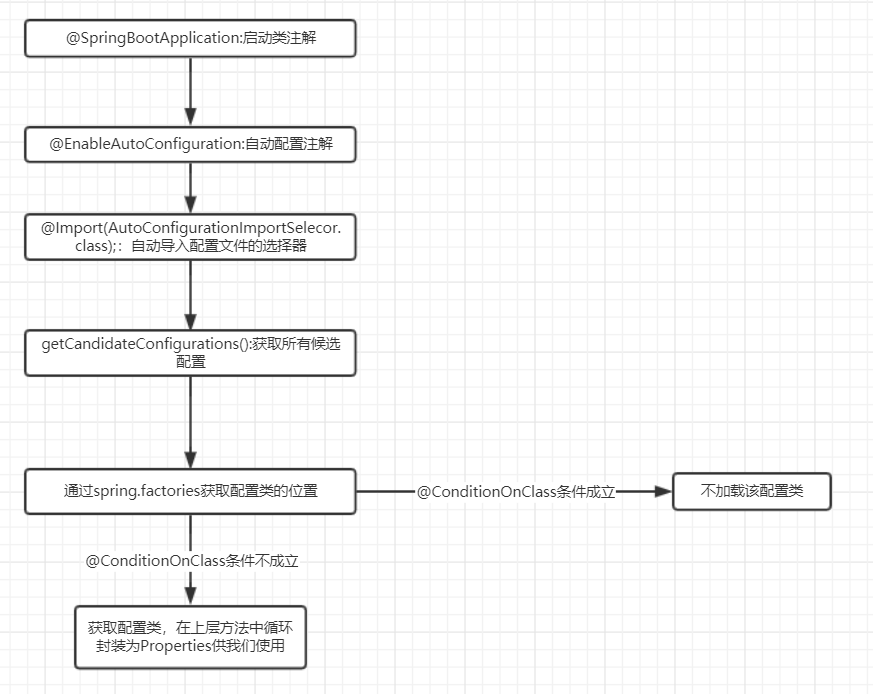
# 总结
- Spring Boot 通过
@EnableAutoConfiguration开启自动装配 - 通过 SpringFactoriesLoader 最终加载
META-INF/spring.factories中的自动配置类实现自动装配- 整个J2EE的整体解决方案和自动配置都在
springboot-autoconfigure的jar包中 - 它将所有需要导入的组件以全类名的方式返回 , 这些组件就会被添加到容器中 ;
- 它会给容器中导入非常多的自动配置类 (
xxxAutoConfiguration), 就是给容器中导入这个场景需要的所有组件 , 并配置好这些组件
- 整个J2EE的整体解决方案和自动配置都在
- 通过
@Conditional注解按需加载的配置类 - 想要其生效必须引入
spring-boot-starter-xxx包实现起步依赖
# 五、约定大于配置 解析
开箱即用的原理说完了,约定大于配置就比较好理解了。其实约定大于配置就是开箱即用中那些自动配置的细节。说的具体点就是:我们的配置文件(.yml)应该放在哪个目录下,配置文件的命名规范,项目启动时扫描的Bean,组件的默认配置是什么样的(比如SpringMVC的视图解析器)等等等等这一系列的东西,都可以被称为约定,下面就来一点一点地说一下SpringBoot中的“约定”。
# maven目录结构的约定
我们可以去Spring的官网查看一下官方文档,看看文档中描述的目录结构是怎样的。
Config locations are searched in reverse order. By default, the configured locations are
classpath:/,classpath:/config/,file:./,file:./config/. The resulting search order is the following:
file:./config/file:./classpath:/config/classpath:/
也就是说,spring的配置文件目录可以放在
- /config
- /(根目录)
- resource/config/
- resource/
这四个路径从上到下存在优先级关系。
# SpringBoot默认配置文件的约定
SpringBoot默认可以加载一下三种配置文件:
- application.yml
- application.yaml
- application.properties
建议使用前两种作为项目的配置文件。
# 项目启动时扫描包范围的约定
SpringBoot的注解扫描的默认规则是SpringBoot的入口类所在包及其子包。
若入口类所在的包是cn.objectspace.demo那么自动扫描包的范围是cn.objectspace.demo包及其下面的子包,如果service包和dao包不在此范围,则不会自动扫描。
# 六、SpringBoot自动配置类如何读取yml配置?
# 从更细节的角度去理解自动配置
上文中我们阐述了一些SpringBoot自动配置的原理,我们是从全局的角度去看自动配置的整个过程。比如从哪个地方开始进行装配流程、如何找到装配的包等。
那么现在将自己的视角贴近SpringBoot,来聊聊application.yml中我们配置的东西,是如何配置到一个个的配置类中的。
# yml配置文件中可以配置那些东西
在上文中我们阐述了SpringBoot总是将所有的配置都用JavaConfig的形式去呈现出来,这样能够使代码更加优雅。那么yml中配置的东西,必然是要和这种配置模式去进行联系的。
我们在application.yml中配置的东西,通常是一些存在与自动配置类中的属性,那么这些自动配置类,在启动的时候是怎么找到的呢?如果你还记得上文的描述,那么你可以很明确地知道:spring.factories。
这个问题我们似乎得到了答案——只要存在与spring.factories中的,我们都可以在application.yml中进行配置。
当然,这并不意味着不存在其中的我们就不能配置,这些配置类我们是可以进行自定义的,只要我们写了配置类,我们就可以在yml中配置我们需要的属性值,然后在配置类中直接读取这个配置文件,将其映射到配置类的属性上。那么就牵扯出我们的问题了:配置类是如何去读取yml配置文件中的信息的呢?
# @ConfigurationProperties
要明白这个问题。我们就首先要去了解这个注解有什么作用。
我们可以自己尝试在application.yml中去定义一些属性,如下:
  object:
    name: Object
    blogurl: blog.objectspace.cn
2
3
我们现在自己定义一个类去读取这个文件:
  @Component
  @ConfigurationProperties(prefix = "object")
  public class TestConfig {
    private String name;
    private String blogUrl;
    public String getName() {
        return name;
    }
    public void setName(String name) {
        this.name = name;
    }
    public String getBlogUrl() {
        return blogUrl;
    }
    public void setBlogUrl(String blogUrl) {
        this.blogUrl = blogUrl;
    }
  }
2
3
4
5
6
7
8
9
10
11
12
13
14
15
16
17
18
然后我们在测试类中输出一下这个对象:
  @SpringBootTest
  class SpringbootdemoApplicationTests {
    @Autowired
    TestConfig testConfig;
    @Test
    void contextLoads() {
        System.out.println(testConfig.getName());
        System.out.println(testConfig.getBlogUrl());
    }

  }
2
3
4
5
6
7
8
9
10
11
测试结果:
Object
blog.objectspace.cn
2
我们可以看到,在控制台中输出了我们在yml中配置的属性值,但是这些值我们没有在任何地方显式地对这个对象进行注入。
所以@ConfigurationProperties这个注解,可以将yml文件中写好的值注入到我们类的属性中。
明白了它的作用,就能明白自动配置类工作的原理了。
# 示例理解
我们依旧是选取SpringMVC的自动配置类,我们来看看其中有些什么东西。
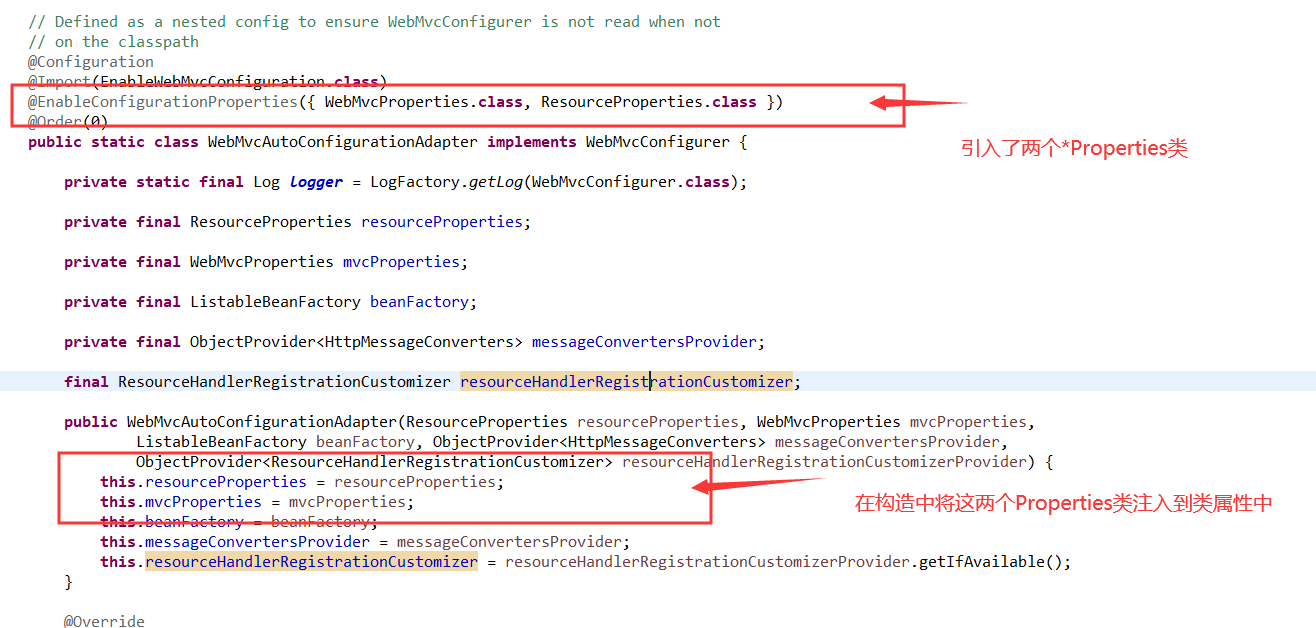
点击任意一个*Properties类中,look一下其中的内容:
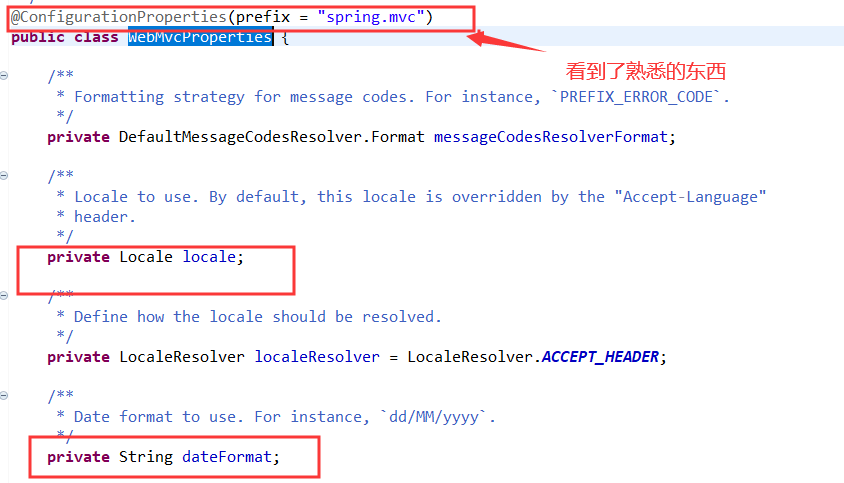
看到这里相信所有人都明白了,我们就拿mvc配置来举例。
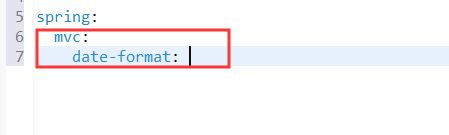
我们在yml中配置的date-format,就可以通过@ConfigurationProperties映射到类中的dateFormat中,然后在通过自动配置类,将这些属性配置到配置类中。
# 七、如何实现一个Starter?
# 第1步:创建 自定义starter 工程threadpool-spring-boot-starter
引入依赖:
<dependencies>
    <!--    springboot启动器    -->
    <dependency>
        <groupId>org.springframework.boot</groupId>
        <artifactId>spring-boot-starter</artifactId>
    </dependency>
</dependencies>
2
3
4
5
6
7
# 第2步:创建配置类,并注入到Spring容器中
创建Author类,方便后续测试
后续测试:另一个工程启动后,输出作者信息。
public class Author {

    private String name;

    private Integer age;

    private String email;

    public Author() {
    }

    public Author(String name, Integer age, String email) {
        this.name = name;
        this.age = age;
        this.email = email;
    }

    public String getName() {
        return name;
    }

    public void setName(String name) {
        this.name = name;
    }

    public Integer getAge() {
        return age;
    }

    public void setAge(Integer age) {
        this.age = age;
    }

    public String getEmail() {
        return email;
    }

    public void setEmail(String email) {
        this.email = email;
    }

    @Override
    public String toString() {
        return "Author{" +
                "name='" + name + '\'' +
                ", age=" + age +
                ", email='" + email + '\'' +
                '}';
    }
}
2
3
4
5
6
7
8
9
10
11
12
13
14
15
16
17
18
19
20
21
22
23
24
25
26
27
28
29
30
31
32
33
34
35
36
37
38
39
40
41
42
43
44
45
46
47
48
49
50
创建配置ThreadPoolAutoConfiguration类,并注入到Spring容器中:
@Configuration
public class ThreadPoolAutoConfiguration {

    /**
     * ConditionalOnClass 需要此项目存在 ThreadPoolExecutor 类,该类为JDK自带,一定成立
     *
     * @return 线程池对象
     */
    @Bean
    @ConditionalOnClass(ThreadPoolExecutor.class)
    public ThreadPoolExecutor myThreadPool() {
        return new ThreadPoolExecutor(10, 10, 10, TimeUnit.SECONDS, new ArrayBlockingQueue<>(100));
    }

    /**
     * 定义作者信息
     */
    @Bean
    @ConditionalOnClass(Author.class)
    public Author author() {
        return new Author("duktig", 23, "duktig666@163.com");
    }

}
2
3
4
5
6
7
8
9
10
11
12
13
14
15
16
17
18
19
20
21
22
23
24
# 第3步:创建resources/META-INF/spring.factories 文件,设置需要自动配置的类
关键的扩展点 key 为 EnableAutoConfiguration
org.springframework.boot.autoconfigure.EnableAutoConfiguration=\
    cn.duktig.threadpool.config.ThreadPoolAutoConfiguration
2
# 第4步:新建工程,并引入自定义starter工程threadpool-spring-boot-starter的依赖
<dependencies>
    <!--    springboot启动器    -->
    <dependency>
        <groupId>org.springframework.boot</groupId>
        <artifactId>spring-boot-starter</artifactId>
    </dependency>

    <!--Spring boot 测试-->
    <dependency>
        <groupId>org.springframework.boot</groupId>
        <artifactId>spring-boot-starter-test</artifactId>
        <scope>test</scope>
    </dependency>

    <!--    自定义线程启动器   -->
    <dependency>
        <groupId>cn.duktig</groupId>
        <artifactId>threadpool-spring-boot-starter</artifactId>
        <version>1.0.0-SNAPSHOT</version>
    </dependency>
</dependencies>
2
3
4
5
6
7
8
9
10
11
12
13
14
15
16
17
18
19
20
21
启动类编写,省略
# 测试
@SpringBootTest
public class MyStarterTest {

    @Autowired
    private Author author;

    @Autowired
    private ThreadPoolExecutor myThreadPool;

    @Test
    public void testGetThreadPoolInfo() {
        System.out.println("核心线程数" + myThreadPool.getCorePoolSize());
        System.out.println("阻塞队列大小" + myThreadPool.getQueue().size());
    }

    @Test
    public void testGetStarterAuthorInfo() {
        System.out.println(author);
    }

}
2
3
4
5
6
7
8
9
10
11
12
13
14
15
16
17
18
19
20
21
结果:
核心线程数10
最大线程数10
2
Author{name='duktig', age=23, email='duktig666@163.com'}
从结果上看,我们在自定义starter的工程中,自定义的配置,在新工程中可以被自动装配。
测试通过。
# 8. Spring.factory 详解
Spring Boot中有一种非常解耦的扩展机制:Spring Factories。这种扩展机制实际上是仿照Java中的SPI扩展机制来实现的。
# 什么是 SPI机制
SPI ,全称为 Service Provider Interface,是一种服务发现机制。
使用Java SPI机制的优势是实现解耦,使得第三方服务模块的装配控制的逻辑与调用者的业务代码分离,实现解耦。我们的应用程序可以根据实际业务情况启用框架扩展或替换框架组件。
# Spring Boot中的SPI机制
在SpringBoot中也有一种类似与Java SPI的加载机制。它在resources/META-INF/spring.factories文件中配置接口的实现类名称,然后在程序中读取这些配置文件并实例化。 这种自定义的SPI机制是Spring Boot Starter实现的基础。
# Spring Factories实现原理
spring-core包里定义了SpringFactoriesLoader类,这个类实现了检索META-INF/spring.factories文件,并获取指定接口的配置的功能。在这个类中定义了两个对外的方法:
- loadFactories 根据接口类获取其实现类的实例,这个方法返回的是对象列表。
- loadFactoryNames 根据接口获取其接口类的名称,这个方法返回的是类名的列表。
上面的两个方法的关键都是从指定的ClassLoader中获取spring.factories文件,并解析得到类名列表
private static Map<String, List<String>> loadSpringFactories(@Nullable ClassLoader classLoader) {
    MultiValueMap<String, String> result = cache.get(classLoader);
    if (result != null) {
        return result;
    }

    try {
        Enumeration<URL> urls = (classLoader != null ?
                                 classLoader.getResources(FACTORIES_RESOURCE_LOCATION) :
                                 ClassLoader.getSystemResources(FACTORIES_RESOURCE_LOCATION));
        result = new LinkedMultiValueMap<>();
        while (urls.hasMoreElements()) {
            URL url = urls.nextElement();
            UrlResource resource = new UrlResource(url);
            Properties properties = PropertiesLoaderUtils.loadProperties(resource);
            for (Map.Entry<?, ?> entry : properties.entrySet()) {
                String factoryClassName = ((String) entry.getKey()).trim();
                for (String factoryName : StringUtils.commaDelimitedListToStringArray((String) entry.getValue())) {
                    result.add(factoryClassName, factoryName.trim());
                }
            }
        }
        cache.put(classLoader, result);
        return result;
    }
    catch (IOException ex) {
        throw new IllegalArgumentException("Unable to load factories from location [" +
                                           FACTORIES_RESOURCE_LOCATION + "]", ex);
    }
}
2
3
4
5
6
7
8
9
10
11
12
13
14
15
16
17
18
19
20
21
22
23
24
25
26
27
28
29
30
从代码中我们可以知道,在这个方法中会遍历整个ClassLoader中所有jar包下的spring.factories文件。也就是说我们可以在自己的jar中配置spring.factories文件,不会影响到其它地方的配置,也不会被别人的配置覆盖。
spring.factories的是通过Properties解析得到的,所以我们在写文件中的内容都是安装下面这种方式配置的:
com.xxx.interface=com.xxx.classname
如果一个接口希望配置多个实现类,可以使用 , 进行分割。
spring.factories支持的key 以及扩展点顺序 参看:Spring boot源码初识一 spring.factories扩展点 (opens new window)
# 参看:
- 淘宝一面:“说一下 Spring Boot 自动装配原理呗?” (opens new window) (详细分析了SpringBoot自动装配的原理)
- 你能说出SpringBoot自动装配的原理吗-吴师兄编程网 (opens new window) (非常完善)
- SpringBoot 究竟是如何跑起来的? (opens new window) (文章很好,分析的很调理。但缺少一些总结,跑起来的步骤是什么没有细说。)
- SpringBoot:认认真真梳理一遍自动装配原理 (opens new window)
- 一文了解ConfigurationConditon接口 (opens new window)